Configuration Profiles
Table of Contents
Quicklinks: Wireshark Configuration Files | Preferences
This file needs reorganization and will likely move around.
Finding the folders
You can find the relevant folders that you have on your computer with tshark -G folders.
[email protected]:~$ tshark -G folders
Temp:                	/tmp
Personal configuration:	/home/rj/.config/wireshark
Global configuration:	/usr/share/wireshark
System:              	/etc
Program:             	/usr/bin
Personal Plugins:    	/home/rj/.local/lib/wireshark/plugins/2.6
Global Plugins:      	/usr/lib/x86_64-linux-gnu/wireshark/plugins/2.6
Personal Lua Plugins:	/home/rj/.local/lib/wireshark/plugins
Global Lua Plugins:  	/usr/lib/x86_64-linux-gnu/wireshark/plugins
Extcap path:         	/usr/lib/x86_64-linux-gnu/wireshark/extcap
MaxMind database path:	/usr/share/GeoIP
MaxMind database path:	/var/lib/GeoIP
MaxMind database path:	/usr/share/GeoIP
Profiles are located in the profiles directory of the configuration folder. On this system, personal or global configuration profiles would be located in
/home/rj/.config/wireshark/profiles and /usr/share/wireshark/profiles respectively.
Listing Profiles
You can use a bash one liner to show the names of available profiles:
bash$ tshark -G folders  | grep conf | awk -F':\t*' '{print $2"/profiles"}' | xargs ls
/home/rj/.config/wireshark/profiles:
Default  'No Reassembly'

/usr/share/wireshark/profiles:
Bluetooth  Classic
Profile Files
Each of these files consist of lines of data delimited with newlines, like a hosts file. A line is a comment if it starts with #.
Available Files
[This is an incomplete list]
| Name | Description | R/W* | Format | Example Line |
|---|---|---|---|---|
| preferences | Wireshark Settings | RW | variable: value | frame.generate_epoch_time: TRUE |
| recent | Recent GUI settings | RW | variable: value | gui.toolbar_main_show: TRUE |
| cfilters | Capture filters | RW | “filter name” filter string | "cf ARP" ether proto 0x0806 |
| dfilters | Display filters | RW | “filter name” filter string | "df ARP" eth.type == 0x0806 |
| colorfilters | Coloring rules | RW | @filter name@filter string @[RGB bg color][RGB fg color] |
@tcp@tcp@[40555,49091,65534][0,0,0] |
| disabled_protos | Disabled protocols | RW | [protocol] | tcp |
| ethers | Ethernet name resolution | R | [MAC address, :-. delmiter] “Description” | ff-ff-ff-ff-ff-ff Broadcast |
| manuf | OUI name resolution | R | [OUI, :-. delmiter] “Manufacturer” | 00:00:01 Xerox |
| hosts | IPv4/IPv6 name resolution | R | [IPv4/IPv6 address] [name] | 192.168.0.1 homeserver |
| services | Network services | R | [name] [port number/name] | mydns 5045/udp |
| subnets | IPv4 subnet name resolution | R | [IPv4 network adress]/[CIDR] [subnet name] | 192.168.0.0/24 ws_test_network |
| ipxnets | IPX name resolution | R | [IPX network number] [host name] | C0.A8.2C.00 HR |
| vlans | VLAN ID name resolution | R | [VLAN ID] [VLAN name] | 123 Server-LAN |
| ss7pcs | SS7 point code resolution | R | [SS7 point code] [SS7 node name] | 2-1234 MyPointCode1 |
* Wireshark reads this file/writes to this file.
Anything with [name] in it can have alphanumeric characters (\w).
Most of this table is lifted directly from Configuration Profiles.
Example Files
These files are from the Wireshark Repo or my system.
My system files
- hosts: Hosts file from an install of Ubuntu 18.04
- preferences: Preferences file from Macos
- recent: Recent GUI settings from Macos
- disabled_protos: Contains some gaming protocols that I’ll never look at
- ethers: List of 3 MAC addresses and names
For Use with VLAN Example
Example In Name Resolutions.
Creating a profile
To add a profile, all you need to do is add a folder in a profiles folder for tshark to recognize it.
mkdir -p /home/rj/.config/wireshark/profiles/NewProfile
Once you add files to it like the ones above, if you specify tshark -C NewProfile, those files will override the defaults.
Editing Your Profile
Guidelines
You may see this at the top of config files:
# DO NOT EDIT THIS FILE! It was created by Wireshark
It might look scary, but editing config files is fine as long as you take precautions.
- Before you start, copy your current profile folder somewhere safe
- Follow the format used by the examples
- If you’re unsure, use the syntax verifier below after saving to make sure files are still readable
- Do not have Wireshark open while editing config files. Wireshark loads config files on startup, so if it’s already open, it could overwrite your configs.
Finding Default Values
It is possible to figure out what the default value is for any key, regardless of profile. For example, for key ipv6.use_geoip:, we can print the default preferences with tshark and grep for the value:
 tshark -G defaultprefs | grep "ipv6.use_geoip:"
#ipv6.use_geoip: TRUE
Current prefs can be printed with tshark -G currentprefs.
Verifying Correct Syntax After Editing
You can use this script to verify that your preferences files have the correct syntax after editing them. It will also print which config files are “extra” and “missing” per documentation. Note that “missing” a documented config is not a bad thing. For example, you will probably never need or use an IPX name resolution file.
Tshark Profile Configuration Flags
For when you don’t want to edit the defaults, tshark allow you to use a different config file or change values inline.
-C ${profile}
Use a different profile folder. Note that you can have many different folders, each with their own config files.
For my available profiles, I can use the Bluetooth profile with tshark -C Bluetooth.
-o ${key:value}
Override a specific setting in preferences. This flag is good for one-time changes to preferences. If you want the change the setting permanently, it is better to edit the preferences file, through Wireshark or manually.
For example, let’s say you’re on an embedded system where you want to avoid computing checksums, which could be potentially expensive. The system default is to have checksum checking disabled, but just this one time, you want to see if the IP header has been corrupted. Given a capture named temp that has IP packets:
# Default is to not check IP checksum
tshark -r temp -V -c 1 | grep checksum
    Header checksum: 0xf9cc [validation disabled]
    [Header checksum status: Unverified]
# With IP checksum checking enabled
tshark -r temp -o ip.check_checksum:true -V -c 1 | grep checksum
    Header checksum: 0xf9cc [correct]
    [Header checksum status: Good]
-o is most used for specifying a series of required cryptographic settings like WEP or ESP.
In this guide, -o is used for WPA2 and TLS1.2 decryption.
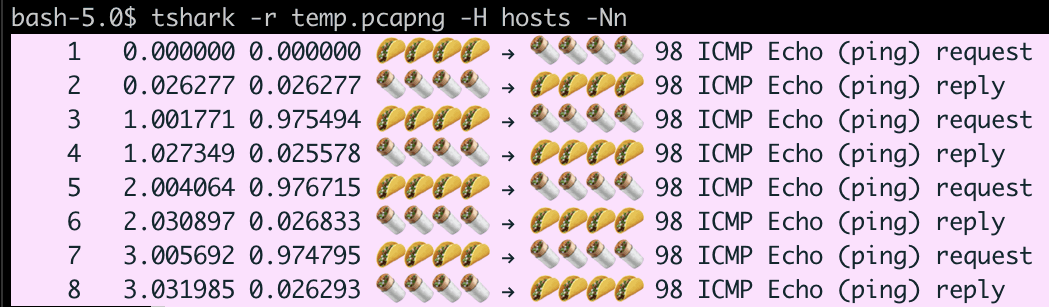
-H ${hosts}
Specify a hosts file by name. Let’s say that burritos and tacos found their way into our hosts file. I don’t know how, but it was delicious.
127.0.0.1       localhost
192.168.1.246   🌮🌮🌮🌮
8.8.8.8         🌯🌯🌯🌯
And we have a capture with 4 pings and responses to 8.8.8.8. Using -H and -Nn we can see these entries.
Further Reading
- 2014-07-01, Roy Cheok, Wireshark: A Guide to Color My Packets